Wednesday, June 10, 2015
Matcha Oven Baked Donuts
Green tea flavored anything is what I am obsessed with. From Green tea frappuccinos to any Green tea flavored desserts. On national donut day, I saw that @californiadonuts had a matcha donut which really intrigued me. Being so far away from getting any "cool" food from my town I decided to give it a try. After many searches on Pinterest and countless websites, I have piled up some ingredients and this one seemed to turn out OK. I just wished it was a little fluffier, but nothing a little leavener can't do. I also opted for the "cake" style donuts meaning to bake them because I just didn't want to deal with hot oil. ya kno?
Ingredients:
1 1/4 AP flour
3/4 cup Sugar
1 tsp salt
1 tsp baking soda
1 tsp Matcha Powder (preferably culinary grade, reduces bitterness)
1 egg
1/2 cup milk
1 tbsp white vinegar
1 tsp vanilla
Glaze:
2 cup confectioners sugar
1 tsp matcha
1/4 cup boiling water
Mix all the dry ingredients together. Mix the wet ingredients seperately then combine. Bake at 350F for 12 mins in a greased donut pan. done. Mix glaze ingredients and coat donuts when cooled.
Saturday, May 23, 2015
Week 14: Pictures
Olly's week 14 in pictures. Above: He finally fit in the Bumbo without looking awkward and flailing his head errryweree
Gave the pool another try and loved it
Got in the floatie
Tried out the stache thanks to Uncle Scooter
Being Cheeky
Momma realizing he resembles PoohBear
Looking tan with the camera flash on. Now he looks like my baby
First time grabbing something
Not a happy hatchling
New activity center
Monday, May 11, 2015
Baby Carriers, Which one to get?
When I had Olly, one of the things I made sure to get was a baby carrier. I'm definitely into the kangaroo baby carrying and it allows me to do things around the house. Having free hands is essential when you don't have help with the baby or around the house. I started trying ALL the different baby carriers util I found the one that fits me and my baby. So let's go through the ones I've bought & tried. Reference: I am 5'1" and 150 lbs with Baby 3 months old, 13.5 lbs and 23 inches
Requirements for a carrier:
Ease of use
Easy to clean
Comfort
Easy for Hubby to use
Photo courtesy of boba.com
Boba Wrap
This was the first carrier I bought. After reading extensive reviews on amazon and over pinterest, I decided to try this first. I loved it initially. It allows your newborn to rest on your chest and let's them sleep pretty soundly since mama's chest is one of the safest places for your baby. However reality slowly started to settle. The Boba wrap was great around the house, but it was be a pain when travelling with it. It takes a while to master wrapping it around your body properly and can get very annoying very quickly when your baby is screaming next to you as you try to figure the wrap. One side of the wrap was also a fuzzy lined making it very comfortable for the baby but since we live in Florida, it was a no go. Baby got hot really quick and caused fussiness.
Pros:
Available everywhere (target, walmart, amazon)
Easy to wash
Great starting from newborns
Fits any body shape + size
Cons:
Gets hot pretty quickly (even more in this Florida heat)
Pain in the @s% to tie. When you mess up, or when it is not tight enough, you have to restart.
Very very long piece of fabric.
Rating: 3.5/5
Photo courtesy of babyktan.com
Since my biggest beef about the boba was my inability to properly tie the wrap, I thought I'd give the baby K'tan a try. It is very similar to the boba minus the wrapping part and requires less fabric. It does come in different sizes, and not a one size fits all. Which can be hard with a growing baby and when losing pregnancy weight. I bought the medium and fit me and my baby perfectly but I find that he slowly starts to slip/sag with prolong use. Which is a big no-no as it is a safety concern. I loved that it was easy to put on. When baby would start getting fussy in the stroller if we're in a place like a mall, I can just pop him in there.
Pros:
No need to tie/wrap
Easy to put on,
Easy to wash
Great starting from newborns
Doesn't get hot because of a linen blend fabric
Cons:
Not easily available in major retailers
Sizing may be difficult
Baby started to slip/sag after prolong use which could be a result from bad sizing
Rating: 3.5/5 (Where it did great in ease of use, it lacked in the sizing hassle)
Photo courtesy of babybjorn.com
Baby Bjorn
After being tired of all this fabric wrapping my body, I decided to give an actual carrier a try. I bought the babybjorn original since I figured it was a great place to start. It was a good carrier as it kept my baby close to me and I can just pop him in there pretty quickly and easily. I find this very essential because once they get into the scream-your-ear-off mode, you want to dilute that as quickly as possible. However without thinking, I bought it in black and since we live in Florida, it got pretty hot pretty quickly. I loved that it had a neck support for newborns and the explore carry (front view) is pretty fun for the baby as well.
Pros:
Available almost at any major retailers
Super duper easy to use
Dad's can use it too
Lightweight
Cons:
Not great for preemies. Baby has to be at least 8lbs and 21 inches long.
Hard to wash since they do not go in the dryer. Lays flat to dry. Therefore if you happen to have a leak, it can take at least a day to wait for it to dry.
Got hot pretty fast from the dark fabric. (Again I live in the hellheat of Florida. This may not be an issue for others)
Pricey (But can be easily found second hand in stores like Once Upon A Child)
Rating: 4/5
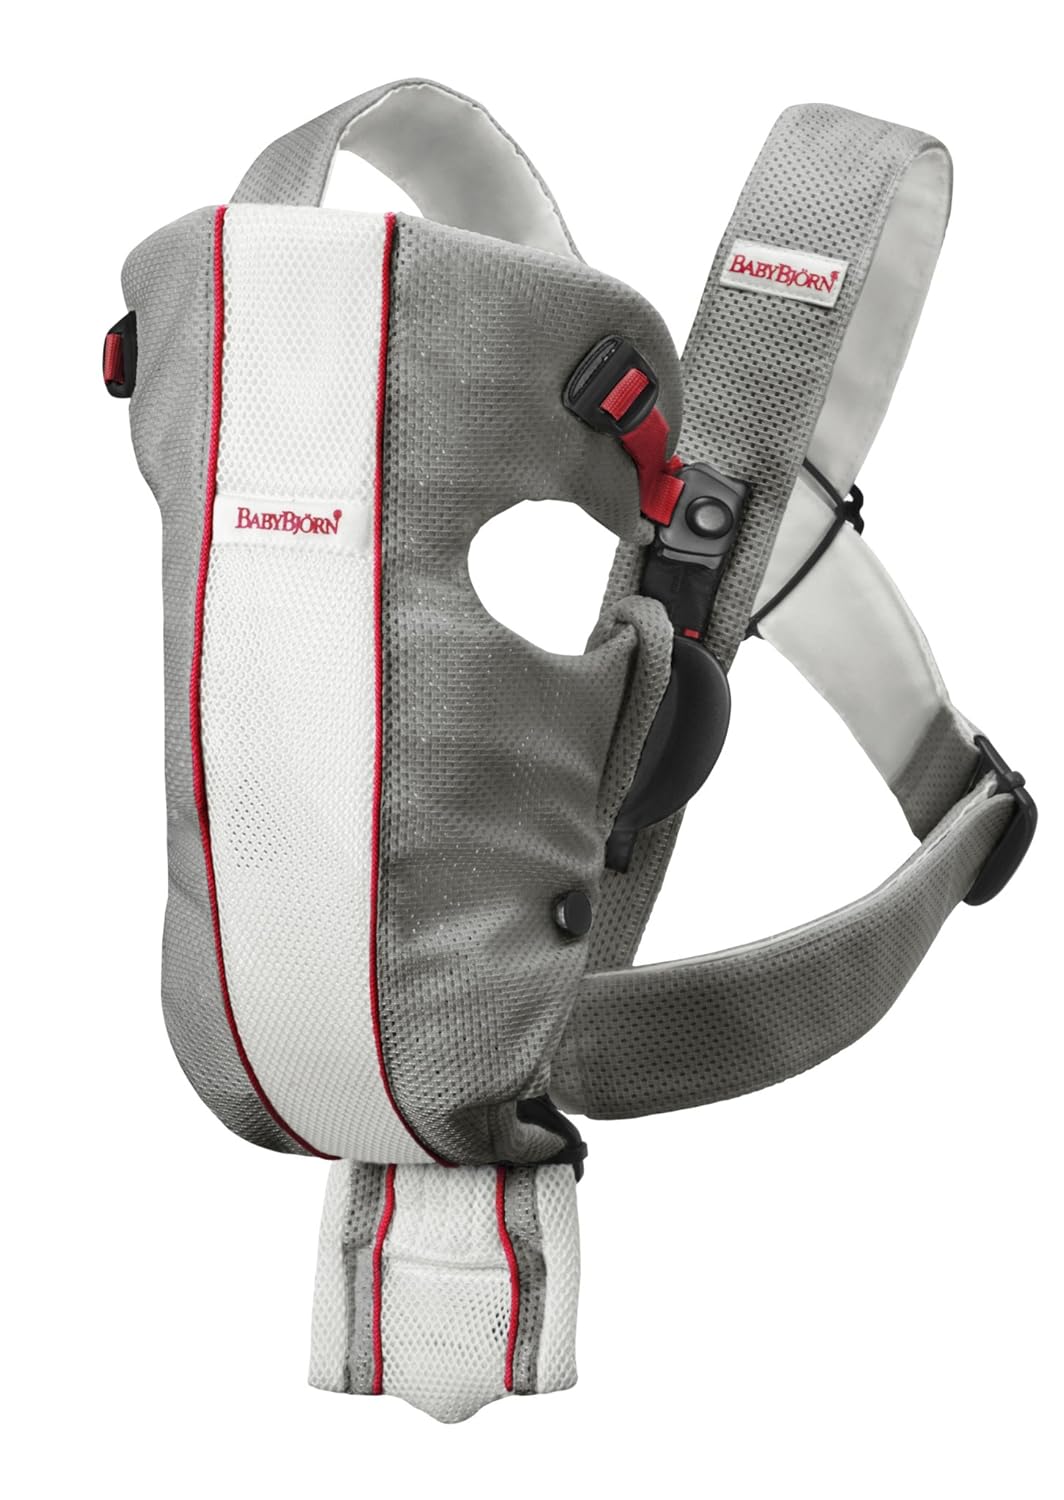
Photo courtesy of amazon.com
Baby Bjorn Mesh
Since I loved the Babybjorn Original so much (minus heat issues), I read up on the babybjorn mesh and decided to give it a try. Results? baby loved it! the ease of use was still there, and we loved that it was completely breathable! I didn't get sweaty, hubby didn't get sweaty and baby did not get hot either. A true test? We loved going on mini hikes on trails to tire out the baby during the witching hour and we absolutely loved it.
Pros:
Easier to wash than the babybjorn original since it was a lighter weight material and dries much faster
Super lightweight
Easy to use
Great for dads
Cons:
Not great for preemies
Longer wait time after washing than other carriers
Pricey (But can be easily found second hand in stores like Once Upon A Child)
Rating: 4.5/5
Photo courtesy of infantino.com
Mei Tei Sash
This carrier was gifted to me by one of my friends. I've never even heard it until it was given to me. It is great for the older babies since it allows you to back carry as well. Comes with padded shoulder straps to take some of the pressure/weight off. I cannot fully do a review on this product as my son is still too small to try all the different positions it allows. However I do not recommend this for smaller babies since the straps doesn't cover much of the sides.
Pros:
Available in a lot of major retailers
Easy to wash
More carrying positions than the others
Cons:
Size restricted. Not made for women/men of a large build.
Not made for most babies from birth.
Rating: ??/5 (tune back for full review)
Final favorite? BabyBjorn Mesh!
Hubby even went fishing!
Sunday, May 10, 2015
Mother's Day 2015
His grumpus face he's had since day one
With dad
Gotta get that Shake Shack Stack!
Tornado Potatoes and Lychee tea!
Recipe: Funfetti Blondies
Recipe:
1 1/4 cup Flour
1 tsp Baking powder
1/4 tsp Salt
1 stick butter
3/4 cup sugar
1 egg
1 tsp vanilla extract
1/3 cup whole milk
1 cup white chocolate chips
4 tbsp rainbow sprinkles
Preheat Oven to 350F
Combine all dry ingredients in a bowl and set aside.
Cream Butter and sugar until fluffy and add egg.
Add in milk and vanilla extract
Then the flour mixture...
Mix the white chocolate chips
Finally add half the sprinkles
Then spread into an 8" pan and place the rest of sprinkles on top.
See how easy that was? and it was delicious!
Saturday, April 18, 2015
Family + 1
Hello readers! Life has been extremely interesting as of recent. My husband and I welcomed our baby boy! After a whole crazy whirlwind of 12 hours of labor, our son Olly was born on Feb 6th, 2015 @ 19:46. A mere 7lbs 1oz, Olly was healthy and a very round baby.
Life has been a roller coaster since then. We've had a lot of sleepless nights, cries, laughs and just about every emotion there is possible. However we never knew we would be so attached to something so small. Now... for those who know me, know that I am not really the mothering type. My maternal instincts are a little on the lower end of the spectrum. Even when I was pregnant, I was thinking that in 9 months, I will be heading to the hospital to pick up the baby, not deliver it. I never said the "aww's" whenever I saw a baby and I never got gushy around children. Therefore knowing that a child was about to be handed to me was a little scary.
The best moment to me was while in recovery (I had to have an emergency C section), they placed Olly on my chest for some skin to skin bonding. Again, not knowing what to expect here. Then the most remarkable thing happened; he crawled and bobbed around with his little head and latched himself onto my breast. I was at a lost for words and was simply in awe to witness this instinct behavior from my baby. From then on, we had to keep him ;)
Baked Parmesan Hot Wings (they taste fried!!)
I enjoy my days off thoroughly. Especially times that I get to experiment new recipes. I know my roommates appreciate my days off! They are my test tasters!
So... I woke up this morning and was just cruising through tastespotting.com which is almost the same thing as pinterest but for food lovers! And came by this recipe by chef John. It is the most delicious and quick mess-free wing recipe I've ever made!
Here is the recipe:
Baked Garlic Parmesan Hot wings
For the parboiling:
Large pot of water 3/4 full
1 cup balsamic vinegar
1 tbsp dried Oregano
1 tbsp dried Parsley
1 tbsp dried Thyme
1 bay leaf
salt
25 chicken wings
Large pot of water 3/4 full
1 cup balsamic vinegar
1 tbsp dried Oregano
1 tbsp dried Parsley
1 tbsp dried Thyme
1 bay leaf
salt
25 chicken wings
Marinade:
8 cloves garlic crushed and mashed with salt
3 tbsp olive oil
red chili flakes
white pepper
black pepper
8 cloves garlic crushed and mashed with salt
3 tbsp olive oil
red chili flakes
white pepper
black pepper
Fine breadcrumbs
Parmesan
Parmesan
1. Start with the parboil broth. Wait until simmer then add the chicken wings. Once it comes to a boil again, set the timer for 15 minutes and let to a rolling boil.
2. Mix the pureed garlic, red pepper flakes, black pepper, white pepper and olive oil in a large mixing bowl.
3. Stir until you get an oily paste
4. Remove the chicken from the broth and pat dry
5. Place all the wings in the large mixing bowl and toss to coat. Add a little breadcrumbs and parmesan cheese as your tossing.
6. Place wings on an oiled baking sheet and put in a 450F preheated oven for 25 mins
7. Let the wings rest for 5 minutes and serve!
Enjoy! Serve with some creamy italian dressing :) OM NOM NOM
Wednesday, April 15, 2015
Spanakopita
Photo: Courtesy of googleimages
Spanakopita should really be one fo those comfort food that you think of when craving one. However many stay away from making them because no one wants to really mess with fillo dough. However I am here to show you the easiest way of making spanakopita with only 5 ingredients and everything in 1 dish. Mind that I don't count your basic ingredients of salt, pepper, oil, butter and breadcrumbs because that is a pantry staple.
Ingredients:
Cut leaf Spinach 16oz Frozen bag (thawed)
1 Sheet roll of fillo dough (thawed)
1 pkg feta (add more to your liking)
2 eggs
2 sprigs of scallions (both white and green parts)
Cut leaf Spinach 16oz Frozen bag (thawed)
1 Sheet roll of fillo dough (thawed)
1 pkg feta (add more to your liking)
2 eggs
2 sprigs of scallions (both white and green parts)
Additional:
Melted butter
Salt
Pepper
Melted butter
Salt
Pepper
1. Preheat Oven to 375
2. Grease a 9 x 9 dish
3. Thaw the frozen spinach, rinse and squeeze dry. Place in large mixing bowl. (It is important that you make sure to get most of the moisture out to prevent having a soggy spinach pie)
4. Mince the scallions and crumble the feta and add to the spinach.
5. Time to get dirty! Start combining them together with your hands. (if you feel that there may be too much liquid, add a couple tablespoons of breadcrumbs to remove excess moisture)
6. Add 2 eggs and continue mashing them together until fully mixed. Add salt and pepper
7. Place 3 sheets of fillo at the bottom of the dish and make sure to brush entirely with melted butter
8. Place another 2 sheets in the opposite direction and brush with butter again.
9. Place all the mixed spinach ingredients into the dish making sure to slightly press it into every corner.
10. This is when the slightly tedious bit begins. Place fillo sheets on top, 2/3 sheets and a time and making sure to lather with butter. Repeat steps until whole roll is gone. Making sure as well that the top is buttered.
11. Place into preheated oven and bake for 40 minutes. Note: Cut your serving squares prior to placing the dish in the oven. Makes a whole lotta difference!
Tada!
Added extra onions simply because.
Note that I do not have an after picture because I was so excited to dig into those crispy squares of golden deliciousness.